Friday, April 27, 2012

Peanut Butter Cup Cookie Brownie Bar

The finished product.


This is my first blog post in 2 months.

I apologize.

To make it up to you, I am about to post the easiest, yummiest, most calorie-ridden dessert that I could find.

There are only two pictures on this post. That's all you need.

Go right now and get:
-A pan.
I used the square bar kind. Not sure if a cupcake pan would work because of the size of the Peanut Butte cups. The smaller cups could work though. Just get whatever you have that will fit these 3 delicious layers.

-Some refrigerated cookie dough.
I didn't even make my own for this one. When I say easy, I mean easy.

-Reese's Peanut Butter Cups.
I made 23 bars so I bought 24 cups. (Making 24 was my original plan, but of course I had to taste test the cookie dough...and the brownie batter...)

-Box of brownie mix and ingredients listed on box.

Preheat oven to 350F.

Grab the cookie dough, scoop out a spoonful (I kinda went crazy when I first started. I suggest using a teaspoon size spoon to scoop it out of the tube.) and smoosh it on the bottom of each square.

Next, place an upside down peanut butter cup on the center of each dough covered square.

Now, scoop out some brownie batter and cover each peanut butter cup. I also went a bit overboard on the brownie batter when I began. I found scooping with a 1/4 cup measuring cup and filling about halfway worked the best. Don't worry about making sure every bit of the cookie is covered. I think it looks cool when it gets all swirly.


Now that you've done all that "hard" work, pop it in the preheated oven for 18-20 minutes. Mine took about 20. You don't want the middles to look too sunken in.

I let them cool in the pan for a few minutes, then when I could stand it I took them out and placed on wire rack. I found the easiest way to get them out of the square pan is to lay the pan sideways and pull each bar out. Let's just say I learned that when I "accidentally" broke one into a million pieces and just had to eat it.

I thought these were going to be waaay too rich but I was pleasantly surprised! The flavors blend together so well (chocolate and peanut butter...who woulda thought?) and no one flavor is too overwhelming.

I plan on placing the bars in cupcake wrappers and arranging on a cake platter to make them look so pretty for the picnic I'm taking them to tomorrow!

I found this recipe on pinterest, but clicking on the picture took me nowhere, so I don't know who to give credit to for this amazing recipe. If you know, let me know! I also don't know what to call these...any suggestions?

Please forgive me for not blogging for 2 months!

PS...did I tell you I have a dishwasher now??? I think I did, but I'll tell you again! :)


Tuesday, February 21, 2012

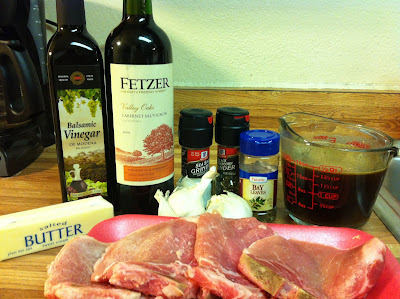
Pork Chops with Garlic & Wine


I'm back!!!

It's been forever since I've blogged...it's good to be back. In case you missed it, we have been ridiculously busy with LIFE lately! I got a new job, we moved into a new (bigger) apartment and have been busy with other stuff. I'm going out of town this weekend so I HAVE to post this week! :o)

Guess what?
.

.

.

I HAVE A DISHWASHER NOW! I guess I have to change my slogan (is that what it's called in the blog world?) at the top of the page! We've only been here a little over a week and I am already in love with it!

OK...I'll quit babbling. Back to the food.

This is one of "The Pioneer Woman's" recipes and Oh. My. Soul.

Delicious.

If you're not following her blog, go do it.

Here's the link to the original recipe: The Pioneer Woman: Pork Chops with Garlic & Wine

The only thing I did differently, is I used 4 pork chops instead of 6, but didn't change any of the measurements of any other ingredients.

What you need:

4 whole pork chops (medium to thin)
2 tablespoons olive oil
2 tablespoons butter
Salt & pepper
1.5 cups red wine
1/2 cup beef broth (more if needed)
1 bay leaf
1 tablespoon balsamic vinegar
18 whole cloves of garlic (I didn't count, I just used 2 whole heads)
1 tablespoon butter (additional)

Salt & Pepper both sides of the chops.

Heat your oil & your butter in a heavy skillet over high heat.

Sear the chop on both sides until they have that beautiful look. 2-3 min per side.

You don't need to cook them through yet, just get the outside looking yummy.

If you haven't already peeled your garlic yet, do it while the meat is searing.

Do it as fast as you can. It's the most annoying, tedious task ever! That's what I was thinking until I decided to search for ways to do it faster.

Here's a fun one.

Throw all of your cloves into a large bowl, place another large bowl on top if it.

Shake the mess outta that garlic, and look at it! Most of the peels should have fallen off.

Back to the chops.

Remove them from the pan once they're nice and brown, reduce the heat to medium-high and toss in those garlic cloves!
Stir them around and cook for several minutes or until they get nice and golden brown.


Add your bay leaf (I added 2 cause I kinda love them) and red wine. Stir it around and let it reduce (TO THICKEN BY COOKING), you can turn the heat up if needed.

Cook it until it's thickened, add in the beef broth (more if necessary) then put the chops back in so that they're swimming in the sauce.

Let the chops cook in the liquid for awhile.

Add the balsamic. Shake the pan to get it distributed throughout the pan.


Let cook for a few more minutes or until done.

Remove the chops from the pan again. Let the sauce reduce a little more until it's very thick and the garlic is soft. Swirl in 1 tablespoon of butter and sprinkle in some salt and pepper.


Arrange pork chops on a platter, and pour the whole pan of sauce (even the garlic) over the chops.

*You may substitute white wine for a lighter sauce.

This is definitely going to become a staple in our home! Tastes so fancy, but once you have all the sauces stocked in your pantry, it's actually very inexpensive!


Tuesday, January 24, 2012

Meatless Monday (Taco Salad)


(sorry about the pictures that I forgot to rotate!)

This is probably my favorite recipe from when my church was on The Daniel Fast.
I thought it was going to just taste like beans and tomatoes, but it had so much flavor.
When I make it again, I'll add some tortilla strips, avocado & maybe some sour cream.
Be creative with this salad!

I got this recipe from a blog that I frequented a lot while on The Daniel Fast! I highly recommend it! www.ultimatedanielfast.com


Makes four 1.5 cup servings

Ingredients:
1 (15.5-oz) can pinto beans, undrained
1 (14.5-oz) can corn kernels, drained (I used a small bag of frozen corn)
1/4 teaspoon garlic powder
1 tablespoon extra-virgin olive oil
1/2 cup diced onion
1 (15-ounce) can black beans, rinsed & drained
2 cups lettuce or spinach
1/4 teaspoon salt
Taco Seasoning
(I used chili powder, cumin, paprika, oregano, & cayenne pepper to taste - I never buy taco seasoning packets. Have you seen the sodium on those things??)
Garnish Ideas: Avocado, sour cream, green onions, sliced black olives, diced tomatoes

Directions:
Preheat oven to 425°F. Spread corn kernels out in one layer on a lightly oiled baking sheet. Bake for 20-25 minutes, or until corn is browned and slightly crunchy.


While corn is roasting, place pinto beans in a small saucepan over medium heat. Add garlic powder and salt.


Cook 10 minutes, stirring occasionally. Using a fork or potato masher, mash beans until they are the consistency of refried beans.


Lower heat, and continue to cook until some of the liquid has evaporated and beans have thickened, about 10 minutes more. Stir frequently to avoid scalding beans on the bottom of the pan.


Heat olive oil over medium heat, and add onions. Cook until onions are soft and translucent. Add black beans, corn, and taco seasoning. Stir well to coat. Reduce heat to low, and keep warm until pinto beans are done.


To serve, place about 1/2 cup lettuce on each plate, and top with 1/4 cup pinto beans and a heaping 1/2 cup of black bean and corn mixture. I dumped a half a can of the spicy Ro*Tel®. Add desired toppings to salad.


I know that roasting vegetables brings out their natural sweetness, but I never roast my corn but I'm going to more often! It added so much to the salad.
I got this recipe from a blog that I frequented a lot while on The Daniel Fast! I highly recommend it! www.ultimatedanielfast.com


Thursday, January 5, 2012

One Pot Spaghetti Squash


Serves 4

Ingredients:
1 spaghetti squash
Half of an onion
Grape tomatoes
1 TBSP minced garlic
1/2 - 1 whole chopped zucchini
2-3 TBSP olive oil divided
1 TBSP fresh chopped parsley or dried parsley flakes
Black pepper to taste
Crumbled feta cheese to taste (optional)


Stab spaghetti squash all over with a knife or fork. Place in oven at 350F for about 30 minutes or until squash is tender to touch.

While that's in the oven, grab a skillet with high sides, or a saucepan (a frying pan with low sides won't hold the spaghetti squash well once you mix everything together) and sauté chopped onion and garlic in the olive oil.

After a few minutes add the zucchini.
Cook until tender.


When the spaghetti squash is tender to the touch, remove from oven and let cool enough to handle.

When cool enough to handle, cut in half lengthwise and remove pulp and seeds from the center of each half and dispose of them. Or dry, season, and roast them like you do pumpkin seeds. Seriously.

If you're new to making spaghetti squash, you might be concerned that you're throwing away the squash. An easy way to tell is that the part that you throw away is usually a bit darker in color than the "spaghetti strands" that you use.

Once you've removed all of the "ickies," grab a fork and scoop out the good stuff!


Every time I make spaghetti squash I marvel that it actually looks like spaghetti noodles.
Keep scooping.

I just scooped mine right into the pan I used that my vegetables were still sitting in. Add your tomatoes, parsley, & another TBSP or 2 of olive oil, mix it around and around, grind some black pepper over the whole thing, and you've got yourself an extremely healthy, delicious meal! I think that feta compliments this so well, but if you're doing The Daniel Fast, or not eating any dairy, go ahead and skip the feta. Also, feel free to use whatever vegetables you're craving, or that you need to use up. I like to use a variety of colors and textures.


Monday, December 19, 2011

Easy Rice & Beans

Meatless Monday!

I don't know if I'm actually going to post a vegetarian meal every Monday or not, but a lot of blogs and cooking shows do it, so I decided to post this meal today.

I used to nanny for a vegetarian family. The mom had this dish at a restaurant in Minneapolis and loved it so much that she asked them how to make it and couldn't believe how easy it was.

Ingredients:

1 cup of rice (white or brown)
1 can black beans
1 can diced tomatoes
whatever seasonings you'd like
(I used Italian seasoning, salt & black pepper)

Cook your rice.

Dump your beans and tomatoes in a saucepan.

When rice is cooked, add to pot and heat long enough to heat tomatoes and beans through. Add seasonings, stir until combined.


This is a meal I make when we're in a hurry but still want something healthier than fast food.
It's satisfying enough to be a main dish, or simple enough for a side dish.

Friday, December 9, 2011

Coconut Chicken


Does anyone else love Pinterest as much as I do?

Since I discovered that website, my "to-do" list has become enormous.

I can finally cross of making "Coconut Chicken" off of the list.

Someone pinned it on pinterest from Budget Bytes blog.

While I'm sure it'd be amazing with the sweet chili sauce that Budget Bytes recommended, we just used katsu sauce because it's our favorite dipping sauce in the whole wide world!

Serves 4

Ingredients:

1.5 lbs skinless boneless chicken breasts
2 large eggs
1/4 cup coconut milk (optional - I didn't have any, but I want to try it with the coconut milk next time)
1/2 cup all purpose flour
1 cup panko bread crumbs
1 cup shredded coconut
1/2 tsp salt
1 cup vegetable oil divided

Here's Budget Bytes recipe. I followed it almost exactly, except I didn't measure ingredients. I forget that I need to do that now that I'm blogging! :o)

STEP 1:
Cut off any extra fat globules from your chicken breasts. Cut each breast into strips, diagonally to prevent the end strips from being really short.


STEP 2:
Prepare your breading station by gathering three bowls. In the first bowl combine the flour and salt. In the second bowl, combine the eggs and coconut milk. Whisk together until well combined. In the third bowl, stir together the panko bread crumbs and shredded coconut.


STEP 3:
Place 1/2 cup of vegetable oil in a large heavy duty skillet and heat over medium/high heat until it is just below smoking. You can test the heat by throwing in a little bit of flour. When it is hot enough, the flour will sizzle and create a lot of bubbles.


STEP 4:
While the oil is heating, dredge the chicken strips. First, coat each strip in the flour and salt mixture. Then dip each into the eggs/coconut milk and finally coat each in panko and shredded coconut. I find it easiest to coat all of them in the flour then go back and then do the egg wash and panko/coconut for each before moving onto the next.


STEP 5:
After breading the strips, the oil should be hot enough. Place about 4 strips in the pan at once. There should only be one layer in the pan and there should be about an inch between each strip. If you over crowd the pan it will get too cold and the strips will soak up a lot of oil instead of frying. Fry the strips for 2-3 minutes on each side or until they are golden brown and crispy. Place them on a plate with paper towel to drain and move on to the next batch. After a couple of batches you may need more oil so you can add the second 1/2 cup to the pan. Allow the oil to come up to temperature before frying the next batch (2-3 minutes). Because the strips are thin, they should be cooked through by the time both sides are browned. You can tell by the texture of the chicken; it should be stiff when pressed. If you cut your strips thicker, you will need to bake off the chicken after frying to make sure the insides are cooked through.


[ I actually had to dump the oil every couple of batches because the coconut shreds that fell off the chicken blackened in the oil and stuck to the chicken. You can see it in one of my pictures. So if your chicken is starting to have blackened shreds, using new oil will fix that.

STEP 6:
When all of the strips are done frying, serve immediately with your favorite sauce!


I served this with rice and my husband and I both loved it! It's a pretty inexpensive meal, which is very important to us newlyweds. :o)