Showing posts with label main course. Show all posts

Tuesday, February 21, 2012

Pork Chops with Garlic & Wine


I'm back!!!

It's been forever since I've blogged...it's good to be back. In case you missed it, we have been ridiculously busy with LIFE lately! I got a new job, we moved into a new (bigger) apartment and have been busy with other stuff. I'm going out of town this weekend so I HAVE to post this week! :o)

Guess what?
.

.

.

I HAVE A DISHWASHER NOW! I guess I have to change my slogan (is that what it's called in the blog world?) at the top of the page! We've only been here a little over a week and I am already in love with it!

OK...I'll quit babbling. Back to the food.

This is one of "The Pioneer Woman's" recipes and Oh. My. Soul.

Delicious.

If you're not following her blog, go do it.

Here's the link to the original recipe: The Pioneer Woman: Pork Chops with Garlic & Wine

The only thing I did differently, is I used 4 pork chops instead of 6, but didn't change any of the measurements of any other ingredients.

What you need:
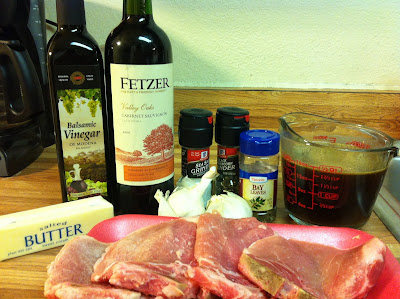
4 whole pork chops (medium to thin)
2 tablespoons olive oil
2 tablespoons butter
Salt & pepper
1.5 cups red wine
1/2 cup beef broth (more if needed)
1 bay leaf
1 tablespoon balsamic vinegar
18 whole cloves of garlic (I didn't count, I just used 2 whole heads)
1 tablespoon butter (additional)

Salt & Pepper both sides of the chops.

Heat your oil & your butter in a heavy skillet over high heat.

Sear the chop on both sides until they have that beautiful look. 2-3 min per side.

You don't need to cook them through yet, just get the outside looking yummy.

If you haven't already peeled your garlic yet, do it while the meat is searing.

Do it as fast as you can. It's the most annoying, tedious task ever! That's what I was thinking until I decided to search for ways to do it faster.

Here's a fun one.

Throw all of your cloves into a large bowl, place another large bowl on top if it.

Shake the mess outta that garlic, and look at it! Most of the peels should have fallen off.

Back to the chops.

Remove them from the pan once they're nice and brown, reduce the heat to medium-high and toss in those garlic cloves!
Stir them around and cook for several minutes or until they get nice and golden brown.


Add your bay leaf (I added 2 cause I kinda love them) and red wine. Stir it around and let it reduce (TO THICKEN BY COOKING), you can turn the heat up if needed.

Cook it until it's thickened, add in the beef broth (more if necessary) then put the chops back in so that they're swimming in the sauce.

Let the chops cook in the liquid for awhile.

Add the balsamic. Shake the pan to get it distributed throughout the pan.


Let cook for a few more minutes or until done.

Remove the chops from the pan again. Let the sauce reduce a little more until it's very thick and the garlic is soft. Swirl in 1 tablespoon of butter and sprinkle in some salt and pepper.


Arrange pork chops on a platter, and pour the whole pan of sauce (even the garlic) over the chops.

*You may substitute white wine for a lighter sauce.

This is definitely going to become a staple in our home! Tastes so fancy, but once you have all the sauces stocked in your pantry, it's actually very inexpensive!


Friday, October 28, 2011

Chicken Enchiladas


I don't claim this recipe to be an authentic Mexican enchilada recipe,
I just claim this to be delicious.
I'm not quite sure how this recipe came to be. Probably mixing and matching recipes, and incorporating what I liked best when I'd order enchiladas at restaurants.
I don't really know what makes an enchilada "authentic."
But like I said...it's delicious.

I made 14 enchiladas with this recipe.

Ingredients:
2 skinless chicken breasts
4 cups chicken broth
2 cups shredded Mexican blend cheese
1 and 1/2 cup shredded mozzarella cheese
corn tortillas
1 TBS cumin powder, or 1 tsp toasted cumin seeds
1 28 oz. can each red & green enchilada sauce (I can never decided which to get, so I started making enchiladas with both and I love it! You can choose red or green.)
1 can chopped green chiles
1/2 jalapeno (the more seeds you remove, the less spicy it will become)
1/2 cup chopped green onion (I only had white onions this time and it was still good)
1 cup chopped cilantro PLUS 2 TBS for garnish (I used way more because we LOVE cilantro!)
Sour cream


First:
Put chicken in pot, cover with enough chicken broth, or mixture of broth and water, and cover. Cook on med-high until chicken is no longer pink.
^^This keeps your chicken juicy and gives it a delicious flavor.^^

When chicken is done, remove from pot and let cool. I stick mine in the freezer for about 15 minutes.


Meanwhile...

While chicken is cooking, do your chopping if you haven't yet. In a pan with high sides, sauté your onion, jalapeno, and cilantro in olive oil until tender and fragrant, about 2 minutes.


Add cumin and sauté for 1 more minute.

(Trying to get picture to rotate...it's not cooperating.)

Then...

Pour half of each can of enchilada sauce into pan with vegetables. Stir until combined. Heat on low.


Now is a good time to preheat your oven to 350 degrees F...

Shred your chicken. Some people will say use two forks, I say use two hands. It's so much faster. (Just make sure your hands are clean and the chicken is cool enough.)


Add shredded chicken and drained can of green chiles to sauce.

Next...

Spoon the bottom of a 9x13 pan with a few tablespoons of sauce.


Find a flat dish that's deep enough for the rest of the sauce, and wide enough to dip a tortilla.
Fill with remaining enchilada sauce.


Heat in microwave for 2 minutes.


Now it gets messy!

Dip each tortilla in the bowl of warm sauce until completely coated.


Spoon chicken mixture onto middle of tortilla.

(another one that won't rotate...I'll be working on that.)

Sprinkle Mexican blend cheese onto mixture.


Carefully fold tortilla and place folded side down. Don't worry if it tears a bit.
(I say this because my very first one tore a bit.)


Repeat until pan is filled. I fit 9 in this pan, and 5 in a smaller one.

Pour any remaining sauce and sprinkle mozzarella cheese on top.


Bake in preheated oven for 25 minutes or until tortillas are soft and cheese is melted. Garnish with black olives, leftover cilantro, and sour cream if desired.


Serve these with rice and beans, and you're set!

Monday, October 24, 2011

Spaghetti Squash "Lasagna"

The first time I bought a spaghetti squash, I didn't know what to do with it.
So I googled "spaghetti squash" and I looked at a bunch of different recipes and ways to prepare it.
I saw a few recipes for spaghetti squash "lasagna" and decided it looked yummy and decided to try it.
My version of it.
a.k.a
The easiest version ever.

I happened to be out of homemade pasta sauce, and making another batch of it while making this meal, so I had to use the jarred stuff. I don't mind the jarred stuff if I need it, as long as I add vegetables and spices to it to make it "semi-homemade."

Ingredients:

Makes 2 HUGE servings. More like 4, but if I say 2, everyone gets their own shell.

1 spaghetti squash
1 lb of ground meat (we prefer beef, but I'll try this with ground turkey too)
1/2 onion
2 TBL chopped or minced garlic
1 jar of pasta sauce (I added sauteed onion and garlic, diced green pepper, Italian seasoning, black pepper, & red pepper flakes)
2 cups shredded mozzarella cheese
2 cups shredded parmesan cheese

Directions:

Preheat oven to 375 F
Stab spaghetti squash all over with a knife, and put in oven
Cook for approximately 45 minutes or until semi-soft and fragrant

(Do this while squash is baking)
Chop up half of an onion, and 2 TBL of garlic.
Heat olive oil in a frying pan on medium high heat, sautee onion & garlic in oil 3-5 minutes.
Add ground beef and cook until cooked thoroughly.
Drain meat if necessary.


Add pasta sauce and cook until heated.

Remove squash from oven when it's ready, and with a large knife, cut in half lengthwise.
Let cool before removing pulp and seeds.

When cool enough to touch, remove seeds and pulp with a fork.
Scrape the flesh of the squash that looks like spaghetti with a fork, while keeping skin in tact, and place in a medium bowl.


When you've scooped as much flesh out as you can, place both halves of the squash into a baking dish.
Add a handful of "spaghetti" to a shell, top with a kitchen spoonful of sauce/meat mixture, top with cheese. (I actually took a slice of pepper jack cheese and ripped it in half for the first layer.)


Repeat layering twice, using a handful of shredded mozzarella cheese for the second layer, and a handful of shredded parmesan for the top layer.

Repeat layers on second half.


Bake at 375 F for 20 minutes or until steaming hot and cheese is melted.
Transfer to plate using two forks.
Be careful doing when transferring. I wasn't very careful with the first one, so it dumped on the plate. Still delicious, just not pretty. The pictured one is the pretty one.


Mmm...low carb deliciousness.