Showing posts with label baking. Show all posts

Saturday, November 12, 2011

Chocolate Pumpkin Pie


Adapted from Michael Symon's recipe as seen on abc's "The Chew"


My friend, Kristy, saw this on "The Chew" and sent me the link in an email with the words, "make this."

So I did.

I'm a HUGE pumpkin pie fan.

I'm also a chocolate fan.

Why not put the two together?

I used my own pie crust recipe, but added about a 1/2 TBSP of granulated sugar to offset the bitterness of the chocolate.


You can make your own pie crust, make Michael Symon's, or use store-bought.
So I'm going to skip that part of the recipe.

Ingredients:

6 oz. semisweet chocolate, chopped
(I used my ever faithful mini chips)
3 oz. bittersweet chocolate, chopped
15 oz. can pureed pumpkin
12 oz. can evaporated milk
3/4 cup light brown sugar
1 TBSP cornstarch
4 TBSP unsalted butter (cut into small pieces)
3 large eggs
1 tsp. vanilla extract
1 tsp ground cinnamon
1/2 tsp ground nutmeg
3/4 tsp ground ginger
1/2 tsp ground cloves

Preheat oven to 425 degrees F

This part was a bit strange to me. When I make pumpkin pie, I NEVER pre-bake the crust. I was skeptical, but it only calls for 15 min of pre-baking, so I did it.

Press pie crust into pie pan.

Cover pie crust with wax paper.

Now, if you pre-bake the crust without any weight, it'll bubble up.

There are these nifty little marble-like things called pie weights

I don't own them.

So I used beans.

Seriously. I googled it.


A whole bag of pinto beans cost about $1.00. I used as much as I needed for the pie, and I still have some leftover. I keep my "pie beans" in a container labeled "PIE BEANS" so that I don't try boiling them. I can use them again and again. A cheaper alternative to pie weights.

Bake at 425 F for 15 minutes.

While that's baking, let's start on the pie filling.

In a double boiler (or a metal bowl resting on a small pan of boiling water) melt your chocolates and butter stirring constantly until smooth.


Remove from heat.

Your pie crust is probably done by now. Take it out of the oven, remove wax paper and pour beans into container to be used again.

Reduce oven temperature to 325 F.

Let's finish the filling.

In a large bowl, or stand mixer, combine remaining ingredients. Beat until smooth.

Fold in chocolate mixture and pour into pie pan
(I had about a cup and a half of leftover filling, plus I overfilled it)


Put on pie crust shield if you have one, or just use aluminum foil so your edges don't get too dark. (I got my shield for $4 at Macy's!)

Put on baking sheet (in case of spills) and bake at 325 F for about 45 minutes or until center of pie has set.

(I told you I overfilled mine!)

Let cool, then refrigerate until ready to eat!


This pie is delicious.

I think I was expecting a classic pumpkin pie with a hint of chocolate.
This tastes more like a chocolate pie with a hint of pumpkin.

I tried this the day I baked it and was like "It's good, but I probably won't make it for the holidays"

But then I had a piece the next day and was like OH MY SOUL THIS PIE IS DELICIOUS!!!

Definitely make this a day ahead. Mmmm....I need another piece...

Friday, November 4, 2011

MIL's Pudding Chocolate Chip Cookies


Cookies.

I love cookies. Chocolately, chewy, soft, warm delicious cookies.

At our wedding reception, Timothy and I decided to do a "cookie buffet."
Kinda like a candy buffet, but with cookies instead.
All homemade.
I emailed family and friends and asked them to share their favorite cookie recipe.
We had a table with 8 different types of homemade cookies.
Want to see?


They were a hit! Everyone loved them! It was well worth the work...baking, individually wrapping, and freezing about 900 cookies.

Anyways. The recipe I'm about to share is one that my mother-in-law has used for years. It's delicious.

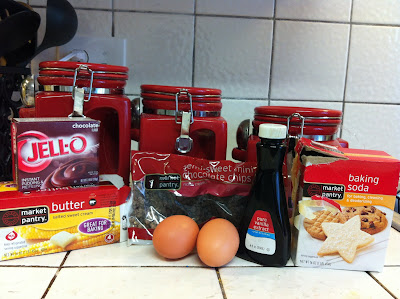
Ingredients:

2 1/4 c. flour
1 tsp. baking soda
1 cup softened butter
1/4 cup sugar
3/4 cup firmly packed brown sugar
1 tsp. vanilla
1 pkg. (4 oz. serving) instant chocolate pudding
2 eggs
1 pkg. (12 oz.) chocolate chips (I used half a bag of mini chips)

Directions:

Combine butter, the sugars, vanilla and pudding mix in large
bowl. Beat until creamy.


Then beat in eggs.
Gradually add in flour, baking soda, and chocolate chips.

Um..I was so excited about these cookies, that I forgot to take pictures of every step...


Batter will be stiff.


Drop by teaspoonful, about 2 inches apart on un-greased cookie sheet
(I used parchment paper)


Bake at 375 degrees for 8 to 10 minutes.
(They might look slightly underdone when you pull them out, but they'll set perfectly.)

I got 28 cookies using my medium Pampered Chef cookie scoop.


A huge THANK YOU to my fabulous MIL for sharing this delicious recipe!


Something you should know...

For our wedding, I used vanilla pudding mix for these, cause we had a completely different cookie that sort of looked like this, and I wanted the table to have a variety. I love this recipe with both types of pudding. Using the vanilla pudding mix will produce a lighter colored, more classic looking chocolate chip cookie, but believe me when I say they taste AMAZING. Using the chocolate pudding mix, will produce a richer chocolate flavored chocolate chip cookie.
I recommend you try it with both!

Friday, October 21, 2011

Doesn't-Get-Any-Easier-Than-These-Almond-Bars


I'm a nanny/household manager.
Basically, I watch kids and help busy parents out in their home.
Cleaning, cooking, organizing, errands, etc.
Then I come home and do it all again...without getting paid. (Well, minus the "watching kids" part...we're not going to be at that point for awhile!)

Anyways, at one of my old jobs in Minnesota, I went to one of my nanny family's neighborhood block parties.
Since I did the cooking and baking for "my" family, I should be able to enjoy the neighbors' cooking and baking, right? I thought so.
One of the neighbors, Alyson, made these AMAZING almond bars. I couldn't stop eating them. Forget the pulled pork sandwiches and 20 kinds of pasta salads, I filled up on almond bars (of course while making it seem like I was nibbling on one, instead of feasting on three.)

The next day, I came to work and guess what my nanny family had brought home? A whole plate of Alyson's leftover almond bars! I had another one and begged Doug (my boss) to get the recipe from his neighbor. He tried and tried and she kept on saying"I'll email it to you."

I gave up hope.

Until one day...

I checked my email and got an email from Doug with "Doesn't-Get-Any-Easier-Than-These-Almond-Bars" (From my neighbor Alyson) in the subject line.

Oh. Happy. Day.

I have made them multiple times for various potlucks, and I get the same response every time. "These are amazing!"

I made them last night for an event, and I'm about to make them again for something else tonight. Main reason being...when I made them last night, I took pictures along the way, but forgot to take any of the finished product...which you NEED.

Ingredients:

3/4 cup melted butter
1.5 cups sugar
2 eggs
1.5 cups flour
pinch of salt
1/2 tsp vanilla
2 tsp real almond extract
sliced almonds to sprinkle on top
1 tsp decorating sugar (or just regular granulated sugar)


Step 1:
Combine all ingredients into medium bowl and stir until mixed thoroughly


Step 2:
Pour into greased 8x8 pan


Step 3:
Bake at 350 degrees for 35 minutes, being very careful not to over bake. (My oven is a beast, so it takes about 28 minutes in mine.) During the last 10 minutes, sprinkle with sliced almonds and 1 Tbsp sugar. (I like to use the large crystal decorating sugar because it's prettier and I like the crunch -- just an idea...As you'll see in the picture below, I am out of decorating sugar, so I just topped with regular granulated sugar.)


Cool completely before cutting.
I like to put them in cupcake liners to make them fancier, but you can just put them all on a plate if you're not trying to impress anyone.

Mmm...just looking at these make me wished I'd made another batch for Tim & I...
Hope you enjoy these easy and delicious bars as much as everyone I know that's tried them does!

Monday, October 17, 2011

The Beginning...of a Blog...


Hi.
My name is Amede. I love to cook. And bake.
I hate doing the dishes when I'm done though.

Want to know a little about me?
I'm 24, I'm a newlywed (awww <3), I detest mushrooms, & I'm a Minnesota girl transplanted to Southern California.
We live in an apartment with a small kitchen. I don't have every small appliance (or big ones for that matter...have I mentioned I don't have a dishwasher?!) and I don't have the latest and greatest kitchen gadgets, but I make good food with what I do have.

I mentioned I am recently married. My husband and I moved 2,500 miles away from all my family and friends. So...something else we don't have is a lot of money. I don't buy the most expensive ingredients, I like to make enough food to freeze, or for leftovers for my husband's lunch the next day.

I'm going to use this blog to post recipes and pictures of things I make in the kitchen. Don't worry, I'm not a gourmet cook. I cook with ingredients that can be found at your local grocery store. I get a lot of recipes online and will always credit the original source. I should mention that I rarely ever make a recipe as it is written. I alter recipes based on what I think will be better and sometimes healthier.

I've never been a blogger, but I post a lot of pictures of my cooking on Facebook and Twitter and my friends (and acquaintances) are always asking for recipes, so I decided to start a blog.

Here's a picture of the "cooking" part of my tiny kitchen. The other side is just the table & chairs and refrigerator.


This is it. By the way, the dishes in the sink are CLEAN. I wasn't going to let you see my dirty dishes. Sorry about the pan of almond bars cooking on the stove. I'll post the recipe for those amazing bars soon!